Map Usage Guide
 The map can be used to specify an area to search for photos in in thses ways:
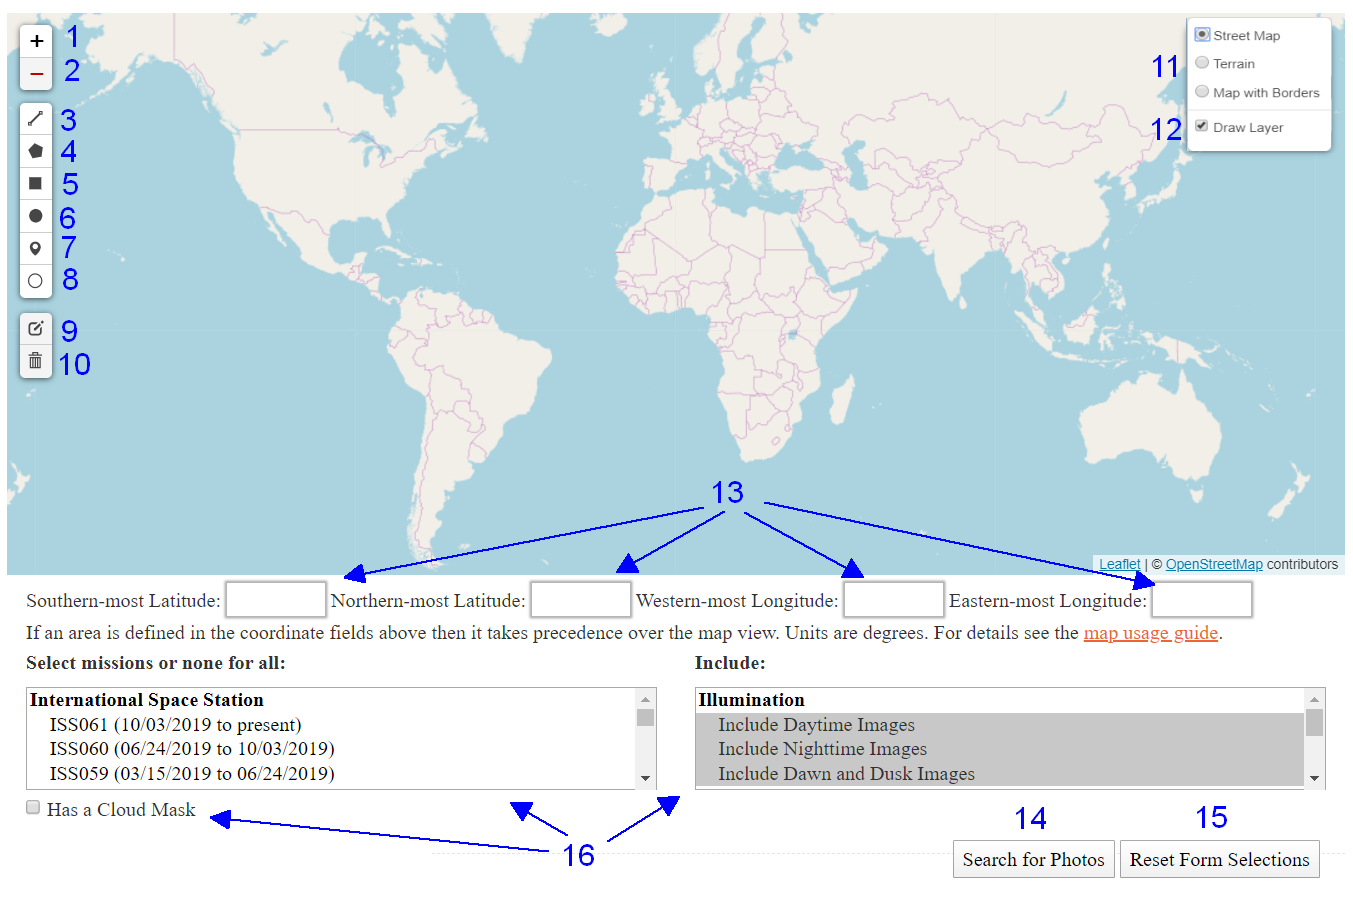
- Zooming the map to the desired area. This method will search the area that is visible on the map. This method requires that you zoom in at least five times. Zooming is done using the controls (1), mouse wheel or shift+drag of the mouse.
- Draw a shape to mark the desired area to search. This method is explained in detail below.
- Edit/type coordinates into the coordinate fields (13). The previous method above can be used to populate the coordinate fields in addition to typing them into the blank fields. The values are all specified in degrees with ranges of [-90,90] for latitude and [-180,180] for longitude. Negative latitudes are south of the equator. Negative longitudes are west of the prime meridian.
When the "Search for Photos" button (14) is used, the coordinate fields (13) are used for the photos query if they are populated. If they are not, then the current view of the map is used, provided the zoom level is sufficient. The number and type of objects you've drawn on the map is not relevant; they only supply values for the coordinate fields (13) and are not considered afterwards for the purposes of defining the search area.
The basemap layer is selected using the control at (11). Basemap layers can be changed at any time without interfering with the drawn objects or the selected search area.
The drawn objects display can be toggled using the control at (12). This can be toggled without interfering with the values in the coordinate fields (13) and therefor does not affect the search area.
The "Reset Form Selections" button (16) can be used to clear the coordinate fields (13) if using the map view instead of any previously drawn shapes is desired. But note that this clears all the form fields, including those at (16).
Using Drawn Objects
You can select the area to search by drawing objects using controls (3) through (8). This works regardless of the map's zoom level. When using this method, the coordinate fields (13) will be populated based on the last object you've drawn or edited. Values in the coordinate fields (13) are rounded to the nearest tenth of a degree because coordinates are stored that way in the database.- The polyline tool (3) is used by clicking the toolbar icon and then clicking the points on the map that you want included in the search and finally clicking the "Finish" button in the pop-up toolbar associated with that draw button. This will populate the coordinate fields (13) so as to specify a retangular area that covers all the points you've clicked.
- The polygon tool (4) is used by clicking the toolbar icon and then clicking the points of the desired polygon area, and then either 1) clicking the first point again to finish the polygon or 2) clicking the "Finish" button to automatically draw the last segment back to the first point. This will populate the coordinate fields (13) so as to specify a retangular area that covers the area of the polygon.
- The rectangle tool (5) is used by clicking the toolbar icon and then dragging the desired rectangle. This will populate the coordinate fields (13) using the points of the rectangle.
- The circle tool (6) is used by clicking the toolbar icon and then dragging the desired circle, starting at the center. This will populate the coordinate fields (13) so as to specify a retangular area that covers the circle.
- The marker tools, marker (7) and circle marker (8), are used by clicking the toolbar icon and then clicking the spot for the marker. This will popluate the coordinate fields (13) so as to specify a single coordinate. So query results for these will only include those photos that either have a center point, or if none is available, a nadir point at the marker location.
Objects can be moved or reshaped using control (9). Clicking that control will put all drawn objects into edit mode. Handles are provided on each drawn object for moving, resizing or reshaping them. Click the "Save" button that pops up when going into edit mode will save the changes whereas clicking "Cancel" will abort the changes. Each time an object is moved or resized, and then saved, the coordinate controls (13) are updated. So if multple objects are changed and then saved, the last object that was saved will be what is represented in the coordinates. Since you don't know which object that is, if you desire to know which object is represented in the coordinates, then change only one prior to clicking the save button.
Drawn objects can be deleted using control (10), which puts the objects into a delete mode. This is done by clicking the control and then clicking each drawn object you desire to delete and then clicking the save button that popped up when you clicked the control. Clicking cancel will return the objects you've clicked to delete since going into delete mode. Another option is to click the "Clear All" button that pops up when you click the control, which will delete all the drawn objects and save that fact all in one move.
Clicking on drawn objects brings up some information about the area corresponding to that object that is supplied by the map API being used. This has no effect on the search area the map will use.